
IR Hunter Thermal Scope
Wow. That is the first word I can say after spending some time with IR Defense’s IR Hunter Thermal Scope. My eyes are open to the possibilities of what a night vision optic can do for the operator; specifically thermal optics. In the past, I have always had to quit just before night and write it off as “dead time”, or time that you can’t really use when it comes to shooting. I always figured it was for people who are either really rich, or for the specialized tactical units that get to use the highest tech gear. How wrong I was! I must admit that I haven’t previously spent any time behind any night vision product before, so this review is coming from someone with little detailed product knowledge and the technology behind it. Sure, I read how they work and about the technology in general, but I feel very out of my element with this and very humbled. So suffice it to say that the following will be from an end-user’s perspective; not a spec-happy techno-geek that knows every every little technical detail, how it works and why it’s better that brand XYZ.
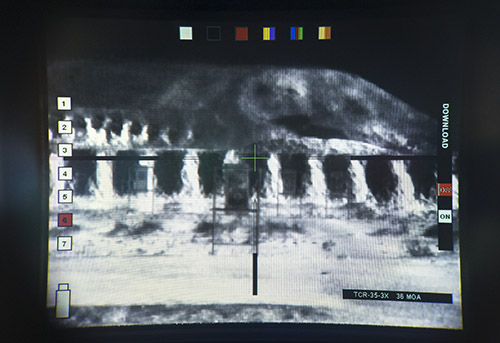
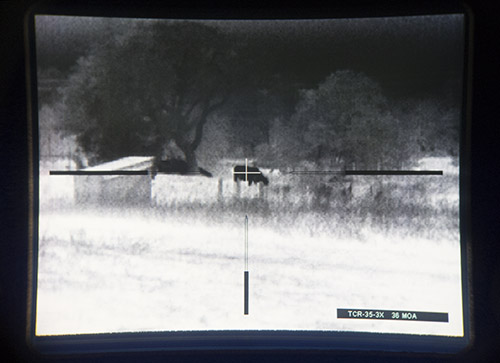
My first experience thermal was mind blowing. That quickly turned into a realization of how powerful this technology is, and how it could be scary if it fell into the wrong hands! It definitely gave me an appreciation for our export laws, that’s for sure. I mean, you can truly see everything regardless of the ambient light. Light itself is of no consequence, of course, as this detects only heat, hence it being thermal. However, light, depending on the source, can also come with heat. And that directly effects the image you see in the thermal scope. For instance, in the middle of a bright-hot summer day, everything is hot. Cement, cars, trees, buildings, people, animals, etc…..they’re all emitting very warm heat signatures. The daytime tends to blow out the image and over contrast what you see, so instead of various shades of black-gray-white gradients, you tend to see the extremes; either black or white. There’s not as much in-between heat signatures or smooth gradients of gray. Therefore, daytime is often less usable with thermal optics, depending on how hot it is outside. At the time of this review, it is the middle of summer and it is hot where I live. I have not been able to look out in a bright but cold environment. I am sure that if I were able to, warm heat signatures would have no problem showing up against the cold background in spite of it being bright outside. NOTE: You can adjust the settings of the scope to make hot days more usable, or the detrimental effects less detrimental, by changing the configuration of the polarity, brightness and ETR levels, but more on that later. Picture below is of a Black-Hot daytime (85 degrees, 9am) view at my local range.
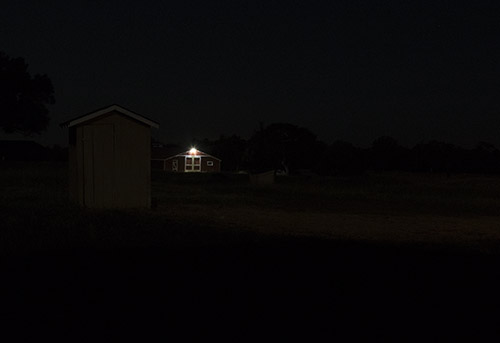
Before I get into the details of this scope, a preface for you readers: I apologize in advance for some of the pictures….they did not turn out like I had hoped and they certainly dont do the scope full justice. They may show the “screen door effect” or moire effects from taking a picture of an LCD screen….there wasn’t much of a way around that. Second, the picture below shows the conditions in which most these pictures were taken (unless otherwise noted…some were day pics). Third, a quick shout out to Chris Sederquist of IR Defense Corp for trusting me with his company’s hardware and providing me with this thermal unit to review: These scopes are not cheap to replace, should something go wrong via mishandling. You would not be reading this now if he hadn’t been willing to send me the equipment.
Alright, enough about the generalizations of thermal capabilities and prefaces, let’s get to why you’re here: To read about the IR Hunter Thermal Scope.
Here are some interesting facts about thermal optics you may not know:
– They’re pretty heavy
– They utilize an LCD screen to show the image
– They eat up batteries like it’s their job
– If you need to zero a thermal optic, you need thermal targets! (ask me how I know)
– Sees through dust and fog as if it wasn’t there
– There are lots of variations that determine the quality/clarity of the final image (explained later)
External Appearance
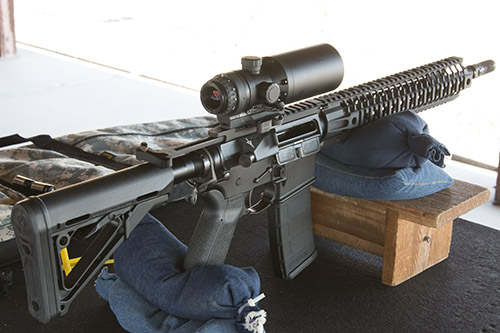
When I first got ahold of the IR Hunter, I didn’t know what to expect. I found a black front lens that was completely opaque (Germanium) with a mirror-like finish, a crystal ocular lens to look through with an adjustable focus, and a black LCD screen inside and behind the ocular lens that was being magnified by the ocular lens. It has uncapped turrets on the left, top and right hand side with no labels. It also had a LaRue Tactical quick release mount (LT681)(LaRue comes standard on IR Defense optics). The battery compartment sits on the lower left hand side and the On-Off switch sits just above it. This scope requires 2 – CR123 batteries and the approximate runtime on a fresh set of Surefire’s will last about 3-4 hours, depending on the level of brightness you set it at. It doesn’t take a genius to figure out that this “optic” is not really an optic in the typical understanding: It is a fully digital scope that has a sensor (FLIR, in this case) that through the use of the front Germanium “lens”, interprets the heat signatures in front of it and displays them on the LCD screen inside the optic, which is what you see when you look through it.
Sensor Options
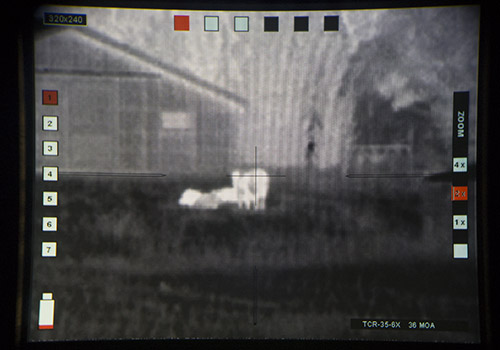
The heart of the scope is certainly the sensor, or “chip”. The IR Hunter has three different resolution options: 160×120, 320×240, and 640×480. At first glance, someone familiar with resolution and what our eyes perceive will look at these numbers and balk. I know I did before I ever looked through one. It is seemingly low to think about an entire landscape being broken down into an image that is only 160×120 pixels. Indeed, the lower end of the scopes certainly show it’s lack of resolution compared to the highest 640×480 resolution. The thing is, however, that the image being sent to the LCD screen is being scaled and somewhat “upsampled”, much like what goes on in an upscaling DVD player when attached to a high def TV. So the final image you see on the screen is actually 800×600 pixels, in spite of the native resolution of the sensor being 160/320/640. Suffice it to say, however, that you DO in fact see a difference in the clarity of the image with the higher resolutions. All three FLIR sensor options come with the pixel pitch of 17 micrometers (um)….the smaller the number, the better the detail. All of the pictures you are seeing in this review are of the 320×240 variant.
Magnification / Lens options
The IR Hunter series thermal scopes also have different magnification levels. Much like DSLR cameras, they are rated in millimeters. The lens options are 19mm and 35mm. The larger the number of millimeter lens, the more magnification. Since most people in the shooting world dont equate the number of millimeter lenses to a level of magnification, it is broken down into the following:
- 19mm = 1x
- 35mm = 3x
The level of magnification I was given was the 35mm/3x variant. I can say with 100% surety that if you are using this for hunting, the 35mm model is the way to go. When you’re outdoors, it really doesn’t feel like 3x. In fact, in the dark it feels only a little more than 1.5x. However, indoor use really brings out the magnification and the 35mm model really isn’t useful as it magnified everything too much. So if using for tactical situations in CQB situations, the 19mm is far preferable. All pictures taken were of the 35mm model. Note that these are fixed and cannot be changed. What’s also interesting is that each scope is given a set amount of adjustment for zero’ing the reticle, prior to factoring in the lens, so the real amount of adjustment per click will depend on what millimeter lens you purchase. For instance, the 19mm model click adjustment is 1.2 MOA/click, but the 35mm model click adjustment is 0.7 MOA/click. This is important to know when zero’ing or dialing out to your target. I didnt list all the chart info, but rest assured that your scope purchase will come with a “Quick Reference Guide” that shows the chart with all the detail.
Digital Zoom/Magnification
The 320×240 model IR Hunter has 3 different digital zoom levels (this is in addition to the fixed “optical” magnification). The three options are 1x, 2x and 4x. One may think that this is a completely awesome feature, and to be sure, it IS a great feature to have, but you also must understand the drawbacks of using the digital zoom because it comes at a cost: Resolution. At 1x, you are receiving the full resolution that the FLIR sensor offers. However, step it up to 2x and you have effective cut your resolution in half. Think about it this way: Draw a rectangle in the middle area of the image screen that is half the size of the entire picture……crop the outer edges off and stretch the inside of the rectangle to the outer edges of the screen (scaling). Sure, you’ve zoomed into your target by 2x, but at half the detail/resolution. Same rings true for 4x mode, but you’re only receiving 25% of the detail/resolution. After using it with this particular model (320×240), I found the 4x to lack enough detail to be extremely useful in identifying the target or object any better than 2x. The 2x mode has enough resolution to see a much clearer image shape in spite of the loss of resolution. Yeah, you can still tell some detail is lost, but I found that it does help identify the target better. Also, keep in mind that the effective zoom level on 2x mode is 4x with the 35mm lens. If you have an optical 2x and you increase that digitally by 2 fold, you have an effective 4x total magnification level with 50% of the resolution. 4x zoom gives you an effective 8x total magnification with 25% resolution.

Reticle Options
The IR Hunter comes with 4 different reticle options. Well, technically it only has 3, but the 4th reticle is called “clip-on” mode, where the screen has NO reticle. This mode is used in conjunction with certain scopes that you can mount behind the IR Hunter, such as the Elcan. In “Clip-On” mode, you would use the previously zero’ed Elcan reticle which would then show against the LCD screen of the IR Hunter. The point of this mode is so that you dont have to bring two rifles with you: 1 for day use and 1 for night use. Personally I find that a bit overkill: Most good optics, or rather good quality mounts, will re-mount to within 1 MOA as long as you mount to the same spot. So clip-on mode for me wouldnt allow me to do anything that I couldn’t do without it. Furthermore, weight savings is significant without two optics. But hey, it’s there if you want/need it. All reticle options, other than the clip-on mode, are based on 18 MOA/36 MOA lines.
As for the other three reticles, you have the TSR (Thermal Subtension Reticle), the TDR (Thermal Dot Reticle), and the TCR (Thermal Combat Reticle). The TSR at first glance looks a lot like an ACOG horseshoe reticle, but do not mistake the subtensions to be a BDC (Bullet Drop Compensator). They’re are all evenly spaced, so they do not match up to a specific bullet type or cartridge at all. What they do is measure 36″ across, with the center line making a left 18″ MOA (basically 18″) and a right 18 MOA. 18″ represents the average width of a person’s shoulders. The reticle features subtensions to 500 yards in 100 yard increments, and then skips to a 1000 yard subtension. Very useful for estimating target distance…..assuming you either know what 18″ looks like at a given distance, or you’re hunting a two legged bipedal variety. The reticle thickness easily covers smaller targets when out past 100 yards, so this reticle may only be very effective on larger targets or simply for ranging, then switch reticles. It also has windage holdover hash marks, but the details dont mention what the measurements are. Know that when you increase the digital zoom levels, the reticle scales with the zoom level the same way a First Focal Pane scope works.
The second reticle is the TDR. This reticle is much like a mildot reticle, except a typical mildot reticle represents 1000:1 between dots, this reticle represents 100:1 between dots. What that translates to is at 100 yards, the distance between dots (actually, they’re small diamonds) is 36″. At 50 yards, the distance between 2 dots = 36″. At 500 yards, the width of a single dot/diamond = 36″. It is just like the previous reticle in that it is FFP based (First Focal Pane), so it will increase and decrease in size depending on the digital zoom level.

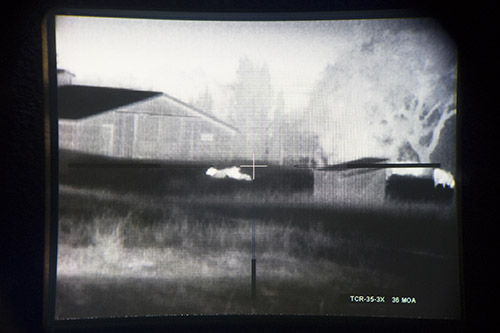
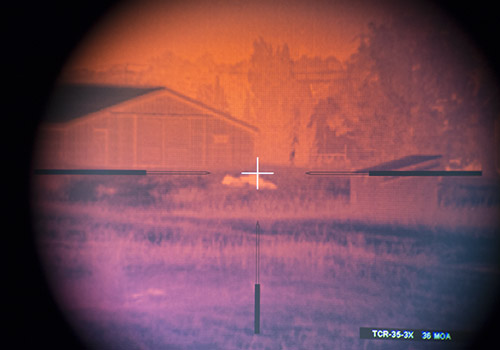
The last reticle is the TCR. This reticle has no hash marks for ranging except for the distance of the crosshair itself. It is a 36 MOA reticle, meaning any tip of the reticle to the other tip represents 36″ at 100 yards. Half the reticle is 18 MOA, so from the center of the crosshair to any end point is 18 MOA. There are no other measurements or ranging abilities of this reticle. It is a very simple reticle with one difference between the other reticles: It is way thinner! It is very fine and great for a bit better precision at ranges where you dont have to worry about drop or ranging (IE: About 200 yards and in).
As you can see, all reticles have three color options: Red, Green and White/Black. The White/Black option is pretty cool because it automatically changes color depending on the shade of the object that the crosshair is on top of. If you have it on a dark object, it will turn white. If on a bright object, it will turn black. It is instantaneous as well, so there’s no lag time in changing color. This does not happen with the red and green options as the screen is black and white, so there’s no reason to switch colors because the red and green show up no matter what the background is. Even still, I feel the Black/White shows up the best. The reticles cannot be turned up in brightness apart from the entire screen.
Screen Coloring Options / Thermal Mode
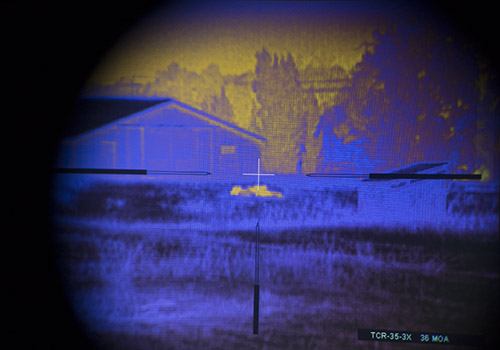
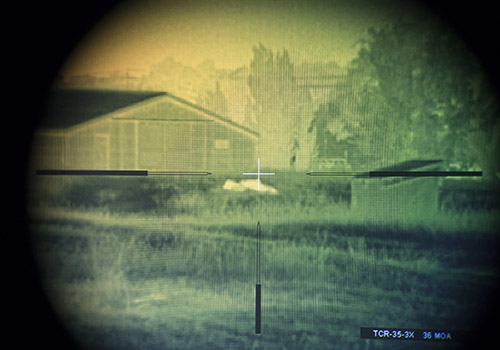
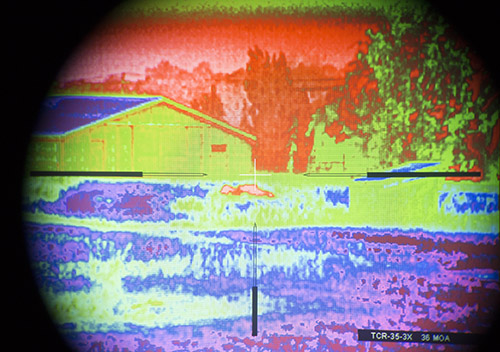
The IR Hunter Thermal Scope has multiple thermal modes for your preference. Of course, it has the White Hot mode, as well as Black Hot mode. But that’s not it! It’s got other coloring schemes or filter overlays. The menu option starts from left to right: White Hot, Black Hot, Red, Green, “Predator”, and Purple/Yellow. I don’t know the official name of the official color schemes, but other than what I call the Predator mode, they are pretty self explanatory. Predator mode is basically like the movie if you’ve ever seen it: The alien predator’s natural vision is thermal based, where hot objects show red, cold objects are blue, and the in-between “gradient” colors from hot to cold are: Yellow, Green Purple. Of all of these modes, WH and BH modes are the most effective, followed by Purple/Yellow, Green/Yellow, Predator, then Red.
White Hot
Black Hot
Purple-Yellow
Yellow Mode
Predator Mode (like the movie)
Red Mode
Furthermore, BH and WH modes have the ability to change in polarity. This is nice because certain scenes or conditions essentially change the contrast to enhance the picture so the objects show more clearly. To be clear, it’s not a contrast adjustment….it truly is a polarity change, but the adjustment on the screen appears to change the contrast. For BW, there are three polarity settings and for WH there are 3 polarity settings. You will need to switch between all of them to see which mode shows the objects the best.
As for the usability of the other modes, the Purple/Yellow mode is 3rd best (BH and WH are tied for first, depending on scene) because it uses two separate colors and objects show up brighter against cold backgrounds. 4th is the Green/Yellow mode, but since green and yellow are very close on the color spectrum, the colors aren’t distinguished as well as P/Y. 5th place is the Predator mode….I dont see this mode as useful for much because of the many colors are distracting. It’s cool to show your friends, but replacing the gradient colors with altogether different colors makes it so the depth perception is essentially nil. The least usable mode, in my humble opinion, is the red mode. It shows only red and shades of red. So hot objects are lighter red and cold objects are darker red. Since there is only one color here and is distinguished only in brightness differences, it shows the contrast between hot and cold the least. However, since it is only one color, it creates a better depth perception than the Predator color scheme. In all honesty, you will use the BH and WH modes 99% of the time. It’s not that the other modes are not effective at all, it’s just that they’re not as effective as BH and WH. Add to that the lack of polarity adjustments to the different colored modes and you will quickly see why you will rarely use them.
ETR Mode
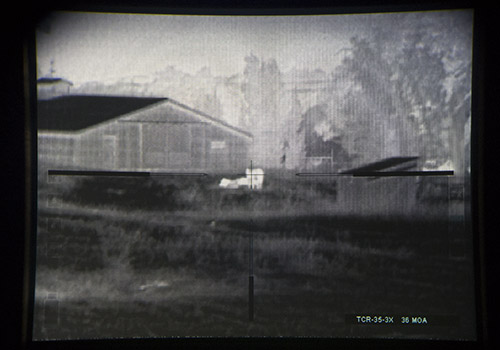
ETR stands for Enhanced Target Recognition. When this mode is turned off, it basically takes an average of the hot and cold image and intelligently gets an average level of brightness (on the fly….will instantaneously change as you change the scene) and set the levels of thermal energy perceived. If you have too much dark in the image, it will lighten up the the entire image so you can see your target properly. What the ETR mode does is reduce the size of the area that the average thermal energy reading is taken from…..namely, closer to the area around your target. You will notice a yellow rectangle of the area that is being sampled when it is on. There are 4 different levels: Off, ETR 1, ETR 2 AND ETR 3. Off was already explained at the top of this paragraph. Levels 1, 2 and 3 all do the same thing, but the area sample size goes from bigger to smaller, getting closer towards the center of the reticle. These modes really help when you have a horizon that is blending in with the target you are scanning. In Black Hot mode, the ground will show way too dark and make it so the warm target you are looking at blends in with the surrounding environment instead of standing out. In White Hot mode, it’s the same thing, but the colors are switched. ETR will take the sky out of the equation and only sample the heat signatures around the target, thus adjusting the thermal energy levels to the immediate area around the target, resulting in a much more effectively lit up target. It’s not a mode you should always have on, but in certain situations, it can really help. Very cool feature. The following animated picture does not show the true ability of ETR due to the conditions these pictures were taken, but you’ll get the point of what it does.
Common Controls (Sharpness, Brightness)
There’s not too much to say about this category other than it has the adjustments for Brightness and the Sharpness. I will say that the brightness levels can go from very dim to extremely bright, especially in night time use. I found my self turning it below the 50% mark for brightness at night because when I took my eye off of the scope, I could barely see with my dominant eye. That is usually a sign of something being too bright. This is a very annoying sensation when it is only happening to one eye….it feels very weird. This happens because your dominant eye adjusts to the brighter screen, but your non-dominant eye has adjusted to the dark setting.
The sharpness setting is a cool feature because it really does make it so the picture seems that it has a higher resolution than it really does. When it is turned up really high, the picture does exhibit some blocking, artifacting or pixelating…..but this would happen in any screen: Same thing happens to your computer screen or your TV when it gets too high. When in the softer levels, the details of the image wash out and you tend to see more of the outlines of objects and not the detailed gradients. Once you find your ideal or desired setting, you wont mess with this very often.
Zero’ing
When I zero’ed the IR Hunter Thermal Scope, it pretty much went without a hitch. Due to the aforementioned forgetfulness of needing thermal targets, I could not see how well the clicks tracked. Depending on the lens model you buy, the clicks will move your point of impact a certain amount @ 100 yards. But even without the thermal targets, I was able to zero the optic successfully during the daytime and it repeatedly hit the same area @ 50 yards if I did my part right (hard to do without a proper target!). Even without having an exact point of aim due to not using thermal targets, I had a 1.5″ – 2″ consistent circle. I have no doubts that with the correct thermal targets, You can nail down your POI and it will be as accurate as you (or your barrel) are.
One thing to note: If you are in 2x mode or 4x mode, the zero’ing function will not show you your reference points for your zero. I attempted to zero in 2x mode and the zero marks disappeared. I have been informed that this is intentional and not a glitch. This is due to the clicks moving the reticle a specific amount regardless of what zoom level you are at. I cannot tell if the zero’ing feature is completely disabled in the zoom modes because when I tried it I could no longer see the reference points, so I stopped further attempts and went back into 1x mode to complete zero.
Pictures / Videos
This is another cool feature of this optic. You can take snapshots of your target or even video! Unfortunately, I was not supplied with the appropriate cable to test this feature out. It certainly would have made my job of taking these pictures easier, but that’s okay. There are two cables available: One for pictures and video, and the other for software updates. The picture and video cable is $175 and the software cable is $250. I am not sure what the exact differences are, but it’s a special proprietary fiber optic connector called the “Fischer Connector”. Whether or not this technology requires something as special as this type of connector remains to be seen. In my view, it seems overkill and would rather see a common connection such as USB due to ease of use. If you’re spending $4000 on a thermal optic, I would like to see the cable(s) come with it since it is not a common connection such as USB. Regardless, maybe there’s something to it that makes it much better or more reliable than USB…..I don’t know for sure. Anyway, cool feature…but a bit pricey unless you’re a reviewer like me and need some quality images straight from the scope. I did the best I could with what I had 🙂
Final Thoughts
This is my first foray into thermal optics and I am just blown away at how powerful they are. It really does turn the night into day and gives a very unfair advantage to the operator. At this point, in states where night hunting is allowed, I dont feel like night hunting takes any special skill: Identify your target, put crosshair on glowing target, pull the trigger. It’s that simple. Looking for those pesky coyotes that are killing your chickens? Have a hog depredation permit? No problem. Anyone who’s never experienced any thermal will be blown away. And anyone who has experienced good thermal will, I believe, find this scope not lacking in much of anything. I did experience a few very minor glitches here and there, but nothing that couldn’t be fixed. Most of them were before Chris noticed that the software on the unit had not been updated to the latest version. The worst that happened was when I was working the menu system and flipping between reticles. I went from the TCR to TDR and back to TCR but the TCR reticle wouldn’t show up up again. I had to turn the unit off and back on, and the TCR came right back up. Just remember: This scope is completely digital, and the user interface (menu system, reticle, various modes, etc) are all programmed in. As you well know, computer software is often prone to glitches and coding errors…..it’s always a work in progress. And the good news is that IR Defense updates their software if something needs a fix. I have been informed that it is their intention that they have the resellers or distributors update the software/firmware (IE: Whoever you bought it from). I dont know if this has been fully implemented yet, but that is the direction they are going. Regardless, IR Defense is not some massive corporation that will sideline your request….they are small, consumer oriented company that cares for the little guy and is able to bypass all the bureaucratic corporate crap that comes with large corporations.
The price of this optic is in the low $4000 range. This particular model used to be their mid-grade scope, but they have now replaced their 160×120 with this model and are coming out with the new MKII IR Hunter 640 model, which is their top tier model. The FLIR based 640 will be their mid-grade level scope. The new MKII model will use a new BAE Systems sensor (chip) that replaces the FLIR model. It is currently available on preorder. From what I’ve heard, the core (chip) is out of this world: The resolution is still 640×480, but the pixel pitch goes down from 17 microns to 12 microns, and it can allegedly differentiate heat sensitivity to the point that you can see the veins in your face! I can’t wait to get my hands on this scope for a review!
There’s one more thing that I forgot to mention about the IR Defense: These scopes are made entirely in America. And that’s not the typical “made in America” mumbo jumbo where they buy all the parts in China, assemble them here in the States and slap on that feel-good sticker….no no, this scope is made from 100% American sourced materials and 100% assembled in America by good ol’ red blooded Americans. By purchasing an IR Defense scope, you are supporting the American economy 100%. Not many companies can say this.
Overall, I am seriously impressed by this scope’s capability. The user menu system is super easy to use and pretty fast too. I really cant think of a better way to integrate a different system that would be more effective. They really thought of everything in this scope and included more than you will likely use. Control over the picture is amazing and the level of detail you can see is pretty incredible given the fact that the sensor is only seeing a 320×240 picture. The only thing I can think of that would make this scope better is the higher resolution sensor. But if you’re intrigued by how much better that might be, wait for my review of the MK II version of the IR Hunter 🙂 The thing is, the 320 FLIR model was priced in the low $5000 range, but has dropped $1000 to make room for the newest scope at the top. And rumor has it that the newest tech is only $1000 more. If indeed it turns out that it is leaps and bounds beyond what this scope can do, it may very well be that the $1000 more will be a small price to pay. I guess time will tell! Stay tuned….
Hello there. Great article. Recently we receive IR Hunters in our warehouse at TechEyes.com and we were amazed by quality of the image and FOV of this scope. I don’t know how IR Defense got such quality but this is now one of my favorite thermal scopes. We recommend most of our customer to go with IR hunter. I would compare it with LWTS by L3.
I bought a 640 x 480 35 mm scope and have been killing hogs like crazy, great product easy to use I can spot hogs at about 1/2 mile it has changed the way i hunt. I have hunted with other night vision scopes as well but this scope is light years ahead. Thanks, Barry
This scope looks awesome!!! I found a link on a premieroptics.net for a free $500 amazon gift card if you purchase it… I think ill be ordering soon.
Can someone tell the difference between IR defense le 100′ vs flI r scout iii 640-512 k. Which will outperform in normal field and why?
Hey Marc, I wish I could answer your question, but I don’t know enough about the FLIR based chips. From what I have been told, the 12 micron BAE chips will be much more sensitive in sensing heat, resulting in a better defined and detailed image. But this is my uneducated answer. There are still other considerations, such as battery life, screen definition, magnification, etc.
IR Defense was recently purchased by Trijicon. I wonder if it has to do with the BAE chip in the IR Defense models?